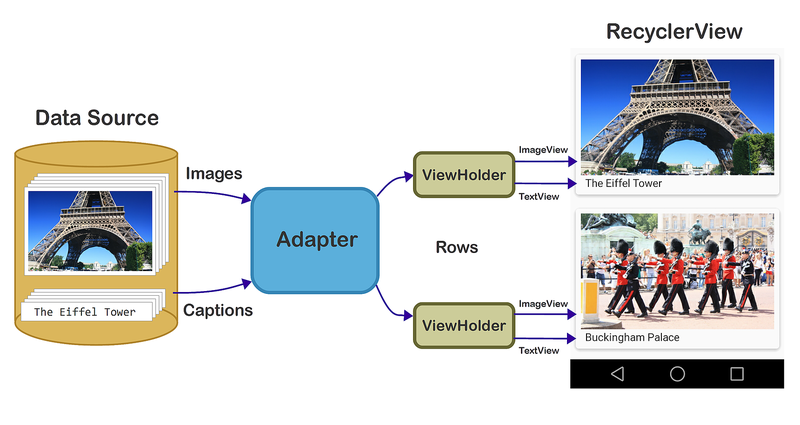
RecyclerView
The RecyclerView class is a more advanced and flexible version of ListView. It's a container for displaying large, scrollable data sets efficiently by maintaining a limited number of View items.
RecyclerView or ListView
Use RecyclerView when you need to display a large amount of scrollable data, or data collections whose elements change at runtime based on user action or network events. Use a ListView to display a short list with static data.
A RecyclerView requires a lot of code to implement but offers performance benefits compared to the ListView.
RecyclerView components
A RecyclerView is made up of several components. This is what adds to the complexity of the RecyclerView:
- Adapter: Use an extension of
RecyclerView.Adapterto connect your data to theRecyclerView. It prepares the data and how will be displayed in a ViewHolder. When the data changes, the adapter updates the contents of the respective list item view in theRecyclerView. - ViewHolder: Use an extension of
RecyclerView.ViewHolderto contain the information for displaying one View item using the item's layout. - LayoutManager: The layout manager handles the organization (layout) of user interface components in a View. This could be a
LinearLayoutManager,GridLayoutor aStaggeredGridLayoutManager - RecyclerView: he scrolling list that contains the list items. An instance of RecyclerView as defined in the Activity layout file to act as the container for the View items.
- Data: The data shown in the RecyclerView
- Layout for one item of data: The layout for a list item is kept in a separate XML layout file so that the adapter can create View items and edit their contents independently from the layout of the Activity.
- Animations: Animations for adding and removing items are enabled by default in
RecyclerView. To customize these animations, extend theRecyclerView.ItemAnimatorclass
Implementing a RecyclerView
Implementing a RecyclerView requires the following steps:
- Add the
RecyclerViewdependency if needed. - Add the
RecyclerViewto the Activity layout. - Create a layout XML file for one View item.
- Extend
RecyclerView.Adapterand implement the OnCreateViewHolder() and OnBindViewHolder() methods. - Extend
RecyclerView.ViewHolderto create a ViewHolder for your item layout. - In the
Activity, inside theOnCreate()method, create aRecyclerViewand initialize it with the adapter and a layout manager.
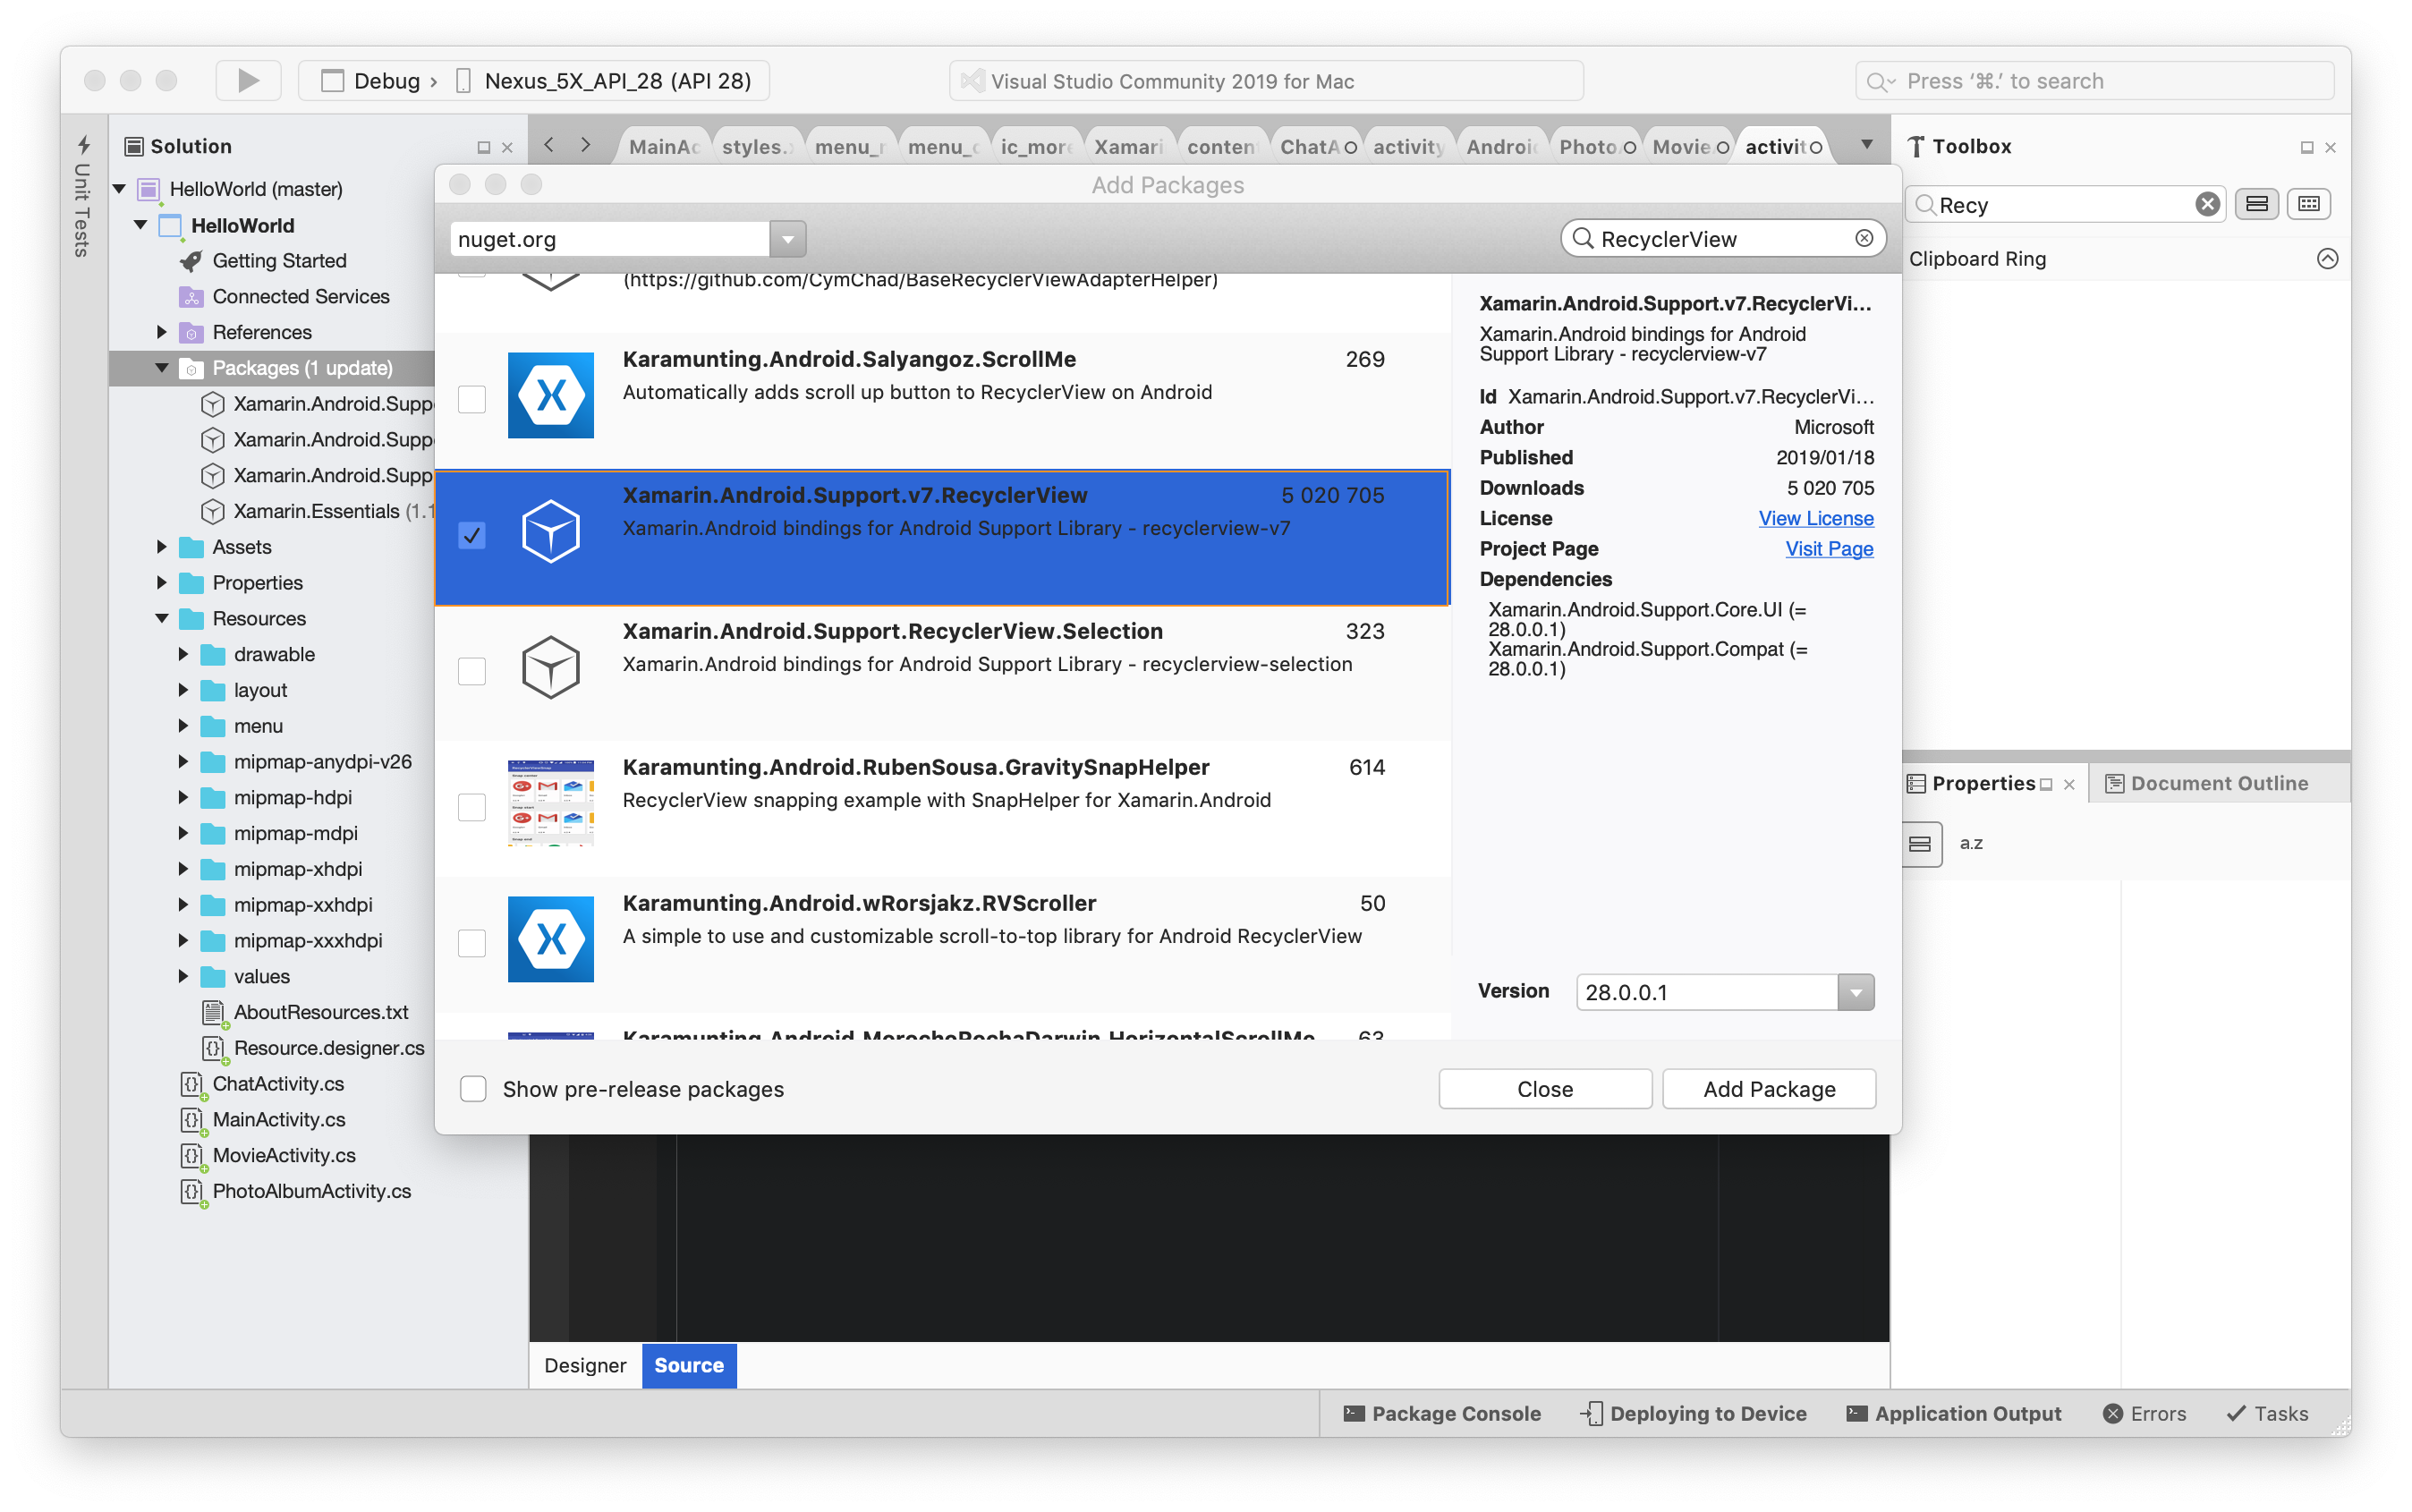
Adding the package dependency
Using the project template from Visual Studio 2019, the support libraries will already be installed, there's nothing to configure.
If the support package is not installed, open the nuget packager manager and search for Xamarin.Android.Support.v7.RecyclerView
Adding Recycler to layout file
Add the RecyclerView to the activity layout file as follows:
1 2 3 4 | <android.support.v7.widget.RecyclerView android:layout_width="match_parent" android:layout_height="wrap_content" android:id="@+id/recyclerView" /> |
Create the layout to hold each item
Create the layout to hold once item use by the ViewHolder.We will create a simple layout here follows:
1 2 3 4 5 6 7 8 9 10 11 12 13 | <?xml version="1.0" encoding="utf-8"?> <LinearLayout xmlns:android="http://schemas.android.com/apk/res/android" android:padding="16dp" android:orientation="vertical" android:layout_width="match_parent" android:layout_height="wrap_content"> <TextView android:text="Popular Movies" android:layout_width="match_parent" android:layout_height="wrap_content" /> </LinearLayout> |
Height is wrap_content
Note that we are wrapping the contents of the height here since this is just the layout for a single item. If you forget and use match_parent each RecyclerView item will take the full screen height.
Creating the view holder
The ViewHolder looks up and stores view references. The view holder also helps with detecting item-view clicks. The RecyclerView force you to use the view holder pattern.
To create the view holder, create a class that derives from the RecyclerView.ViewHolder and add all the view references.
1 2 3 4 5 6 7 8 9 10 11 12 | // Class should derive from RecyclerView.ViewHolder public class MovieViewHolder : RecyclerView.ViewHolder { public TextView Title { get; private set; } // Use the constructor that takes in a View public MovieViewHolder(View itemView) : base(itemView) { // Locate and cache view references Title = itemView.FindViewById<TextView>(Resource.Id.txtTitle); } } |
Create an adapter
The adapter loads each RecyclerView row with data. Create a class that extends the RecyclerView.Adapter and implement the OnBindViewHolder(), OnCreateViewHolder() methods the property ItemCount as follows:
1 2 3 4 5 6 7 8 9 10 11 12 13 14 | public class MovieAdapter : RecyclerView.Adapter { public override int ItemCount => throw new NotImplementedException(); public override void OnBindViewHolder(RecyclerView.ViewHolder holder, int position) { throw new NotImplementedException(); } public override RecyclerView.ViewHolder OnCreateViewHolder(ViewGroup parent, int viewType) { throw new NotImplementedException(); } } |
The following required RecyclerView.Adapter methods should be implemented:
-
OnCreateViewHolder– Instantiates the item layout file and view holder. -
OnBindViewHolder– Loads the data at the specified position into the views whose references are stored in the given view holder. -
ItemCount– Returns the number of items in the data source.
Implement OnCreateViewHolder
In the OnCreateViewHolder, add the code to inflate the layout file for the individual row as follows:
1 2 3 4 5 6 7 8 | public override RecyclerView.ViewHolder OnCreateViewHolder(ViewGroup parent, int viewType) { // Inflate the layout file var itemView = LayoutInflater.From(parent.Context).Inflate(Resource.Layout.item_row_moview, parent, false); // Return the view holder return new MovieViewHolder(itemView); } |
Implement OnBindViewHolder
In the OnBindViewHolder you retrieve the view holder and set the data on it. The following code first casts the generic view holder to the MovieViewHolder and then sets the title. You are also passed the position, use it to retrieve the right data from your list.
1 2 3 4 5 6 7 8 9 | public override void OnBindViewHolder(RecyclerView.ViewHolder holder, int position) { // Cast the holder to the right type MovieViewHolder mv = holder as MovieViewHolder; // Setup the title view var title = _titles[position]; mv.Title.Text = title; } |
Implement the ItemCount
Add a custom constructor that you pass in the data to the adapter. Use the size of the data for the ItemCount as follows:
1 | public override int ItemCount => _titles == null ? 0 : _titles.Count; |
and the custom constructor that we use to pass in the data to the adapter:
1 2 3 4 5 6 | private List<string> _titles; public MovieAdapter(List<string> titles) { _titles = titles; } |
The complete adapter class should be as follows:
1 2 3 4 5 6 7 8 9 10 11 12 13 14 15 16 17 18 19 20 21 22 23 24 25 26 27 28 29 30 | public class MovieAdapter : RecyclerView.Adapter { private List<string> _titles; public MovieAdapter(List<string> titles) { _titles = titles; } public override int ItemCount => _titles == null ? 0 : _titles.Count; public override void OnBindViewHolder(RecyclerView.ViewHolder holder, int position) { // Cast the holder to the right type MovieViewHolder mv = holder as MovieViewHolder; // Setup the title view var title = _titles[position]; mv.Title.Text = title; } public override RecyclerView.ViewHolder OnCreateViewHolder(ViewGroup parent, int viewType) { // Inflate the layout file var itemView = LayoutInflater.From(parent.Context).Inflate(Resource.Layout.item_row_moview, parent, false); // Return the view holder return new MovieViewHolder(itemView); } } |
Creating the RecyclerView
Finally, you now can wire everything together now.
-
Declare the
RecyclerView, the adapter and the titles list.1 2 3
private RecyclerView _recyclerView;
private MovieAdapter _movieAdapter;
private List<string> _titles;
-
Find the
RecyclerView1
_recyclerView = FindViewById<RecyclerView>(Resource.Id.recyclerView);
-
Create the adaper
1
_movieAdapter = new MovieAdapter(_titles);
-
Connect the adapter to the
RecyclerView1
_recyclerView.SetAdapter(_movieAdapter);
-
Setup the RecyclerView with the default layout manager
1
_recyclerView.SetLayoutManager(new LinearLayoutManager(this));