Android Activities
In this chapter you learn about the Activity class, the major building block of your app's user interface (UI). You also learn about using an Intent to communicate from one activity to another.
Activities
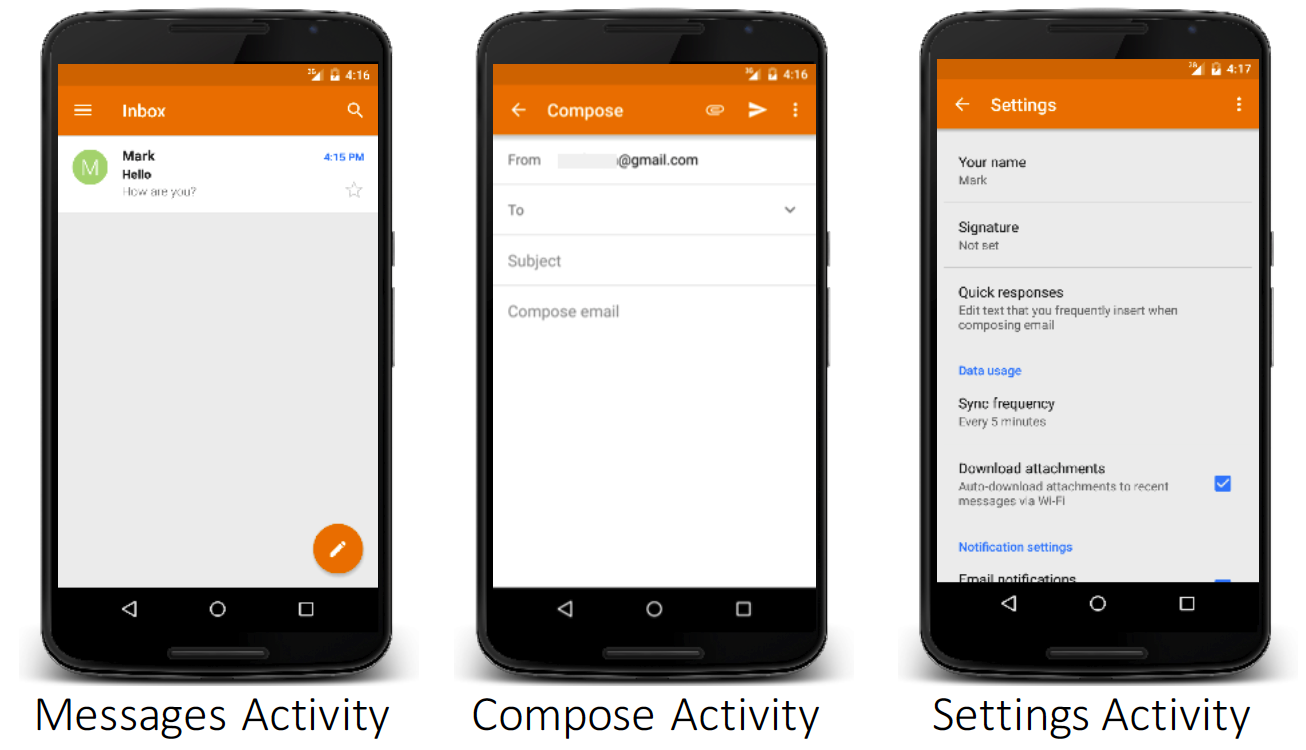
An activity represents a single screen in your app with an interface the user can interact with. An email app for example might contain several Activities:
- Message Activity
- Compose Activity
- Settings Activity
Your app is made up of a collection of activities that you create yourself, or that you reuse from other apps.
- In an app, they should be one Activity designated as the main activity. This is the Activity that is started by Android.
- An Activity can start another activity
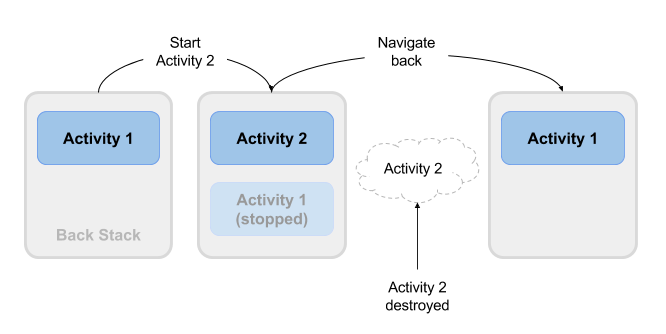
- Each time a new activity is started, the previous activity is stopped and put in a back stack. The system maintains the previous activity state.
- The activity is notified of each state by the system using life cycle methods.
Creating activities
To implement an Activity in your app, do the following:
- Create a class that inherits from the
AppCompatActivityorActivity - Implement a basic UI for the Activity in an XML layout file.
- Decorate the class with the
[ActivityAttribute]
Create the activity
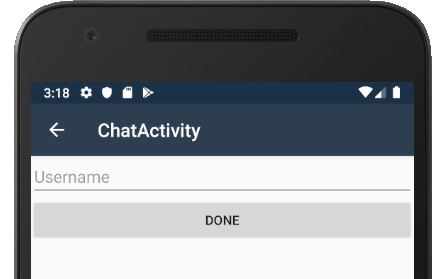
To create an Activity in Visual Studio, Add New file, choose Android and choose Activity and give a name to the class.
When you create a new activity from the wizard, you get the code as follows:
1 2 3 4 5 6 7 8 9 | [Activity(Label = "ChatActivity")] public class ChatActivity : Activity { protected override void OnCreate(Bundle savedInstanceState) { base.OnCreate(savedInstanceState); // Create your application here } } |
[Activity(Label = "ChatActivity")] decorates the class as an Android activity and generates the required xml tags in the AndroidManifest.xml file.
Use AppCompatActivity for backward compatibility
For the app to be backward compatible, its recommended to derive your activity class AppCompatActivity instead of Activity
!!! question "What is the OnCreate" method? The OnCreate method is a required life cycle method that is called when the activity is created. You setup the layout file for the activity in this method.
Implement the UI
Create the UI xml layout file for the activity in the Resources -> layout folder. In Visual Studio, use the Add New file menu to add a new Android layout file.
Naming conventions
You should adopt a naming convention for your layout files. Generally for the activity, you should start with activity_ prefix, e.g for the compose activity, the layout file should be called activity_compose.axml.
Associate the activity with the layout file
Once the layout file is created, use the SetContentView method in the OnCreate method of the activity as follows:
1 2 3 4 5 | protected override void OnCreate(Bundle savedInstanceState) { base.OnCreate(savedInstanceState); SetContentView(Resource.Layout.activity_compose); } |
The SetContentView takes in an resource id. Remember the layout file is referenced using the Resource.Layout.<layout-name> class.
Intents
Each activity is started or activated with an Intent, which is a message object that makes a request to the Android runtime to start an activity or other app component in your app or in some other app.
When your app is first started from the device home screen, the Android runtime sends an Intent to your app to start your app's main activity (the one defined with the MAIN action and the LAUNCHER category in the AndroidManifest.xml file). This is the Activity with the MainLauncher = true set.
To start another activity in your app, or to request that some other activity available on the device perform an action, you build your own intent and call the StartActivity() method to send the intent
In addition to starting an activity, an intent can also be used to pass data between one activity and another. When you create an intent to start a new activity, you can include information about the data you want that new activity to operate on.
Intent types
Intents can be explicit or implicit:
- Explicit intent: Used to start activities using their fully qualified name.
- Implicit intent: Used to start activities without specifying the fully qualified name. The system will use the default registered activity or show options to choose th activity.
Starting activities with explicit intents
To start an activity from another activity, you use the explicit intent, e.g the following will start the ChatActivity from MainActivity:
1 2 3 4 5 | // Create intent with the type of the Activity Intent intent = new Intent(this, typeof(ChatActivity)); // Start the activity StartActivity(intent); |
The first line creates the intent, passing this as the Context. Then the second line starts the activity.
What is Context
Context is the class that contains the runtime information about the environment in which the activity is running in. An activity inherits from Context so we can pass in this whn the context is required.
What starts the activity?
Android uses a process called the ActivityManager to run the activity. When you call StartActivity the information in the intent is sent to the ActivityManager. You can also call activity manually from the command line using adb am
Manually closing an activity
The started Activity remains on the screen until the user taps the Back button on the device, at which time that Activity closes and is reclaimed by the system, and the originating Activity is resumed.
When can also close the Activity by using the Finish method as follows:
1 2 3 4 | private void CloseActivity() { Finish(); } |
Passing data between activities
You can also pass on data when you start an activity. They are two ways to pass data to the called activity:
- Set data as a
URI - Pass data using
Intentextras
Passing data using Intent uri
The Intent uri can only hold one piece of information, the URI representing the location of the data you want to operate on. The following code passes the telephone number to the ChatActivity as follows:
1 2 3 | Intent intent = new Intent(this, typeof(ChatActivity)); intent.SetData(Android.Net.Uri.Parse("tel:0114804898")); StartActivity(intent); |
The SetData method takes in the uri.
On the called activity, you can retrieve the uri using the Data property on the Intent property as follows:
1 2 3 4 | // This is in the called Activity if(Intent.Data != null) { Log.Debug(TAG, $"{Intent.Data}"); } |
Passing data with Intent extras
In the first (sending) Activity, you:
- Create the Intent object.
- Put data or extras into that Intent.
- Start the new
ActivitywithStartActivity().
In the second (receiving) Activity, you:
- Get the Intent object the
Activitywas started with. - Retrieve the data or extras from the
Intentproperty.
Add the extra data
We can either create a Bundle or pass the extras directly to the intent object. The following code passes the extra as single fields:
1 2 3 4 | Intent intent = new Intent(this, typeof(ChatActivity)); intent.PutExtra(EXTRA_USERNAME, "codeguru"); intent.PutExtra(EXTRA_USERNAME, "Hi there!"); StartActivity(intent); |
We also defined the constants in the MainActivity as follows:
1 2 | public static readonly string EXTRA_USERNAME = "com.peruzal.praat.USERNAME"; public static readonly string EXTRA_NEW_MESSAGE = "com.peruzal.praat.NEW_MESSAGE"; |
You can pass serializable data with the PutExtra method. To retrive the data on the called activity with use the Intent object as follows:
1 2 3 | if(Intent.HasExtra(MainActivity.EXTRA_USERNAME)) { var username = Intent.GetStringExtra(MainActivity.EXTRA_USERNAME) } |
Passing complex objects
To pass complex objects with the intent, you can use Newtonsoft JSON. First convert the data into json and deserialize on the called activity. Alternatively you will have to implement the Serializable interaface. Its easy to serialize and deserialize from json.
Using the Bundle
You can put all the extras in the Bundle and the then use the PutExtras method to add the bundle to the intent as follows:
1 2 3 4 5 6 7 8 9 10 | Intent intent = new Intent(this, typeof(ChatActivity)); // Create a bundle object Bundle bundle = new Bundle(); // Add the extras bundle.PutString(EXTRA_USERNAME, "codeguru"); bundle.PutString(EXTRA_NEW_MESSAGE, "Hi there"); intent.PutExtras(bundle); StartActivity(intent); |
Get the data in the called activity:
1 2 3 4 5 | if(Intent.Extras != null) { var username = Intent.Extras.GetString(MainActivity.EXTRA_USERNAME); Log.Debug(TAG, username); } |
Getting data from an activity
You can get data from the called activity. Here are the steps:
- Start the activity with the
StartActivityForResult()method instead ofStartActivity - Create a new
Intentin the launched started activity and return the data in theIntent - Implement the
OnActivityResultin the calling activity to process the returned data
Start the result
You need to specify a request code when you launch the activity for result:
1 2 | Intent intent = new Intent(this, typeof(ChatActivity)); StartActivityForResult(intent, USERNAME_REQUEST); |
The USERNAME_REQUEST is defines a field
1 | private readonly int USERNAME_REQUEST = 100; |
In the called activity we will add the following code:
1 2 3 4 5 6 7 8 9 10 | btnDone.Click += delegate { var editUsername = FindViewById<EditText>(Resource.Id.edit_message); var username = editUsername.Text; Intent intent = new Intent(); intent.PutExtra("USERNAME", username); SetResult(Result.Ok, intent); Finish(); }; |
In the above, we have a done button thats wired to a click event. Within the event, we find the edit text and get the username.
We use the username and pass it as the data to the intent. We then use the SetResult method, set the result to be OK and pass in the intent object.
Retrieving the passed data
To retrieve the returned data we use the OnActivityResult result method and get the data from the intent. The OnActivityResult is used to receive data from other activites, so we need to check if the request code matches first and also is the result was not cancelled as follows:
1 2 3 4 5 6 7 8 9 10 11 12 13 14 15 | protected override void OnActivityResult(int requestCode, [GeneratedEnum] Result resultCode, Intent data) { base.OnActivityResult(requestCode, resultCode, data); // Check if its the same request code used to start the acitivity if(requestCode == USERNAME_REQUEST && resultCode == Result.Ok) { // Check if the key is in the bundle if (data.HasExtra("USERNAME")) { var username = data.GetStringExtra("USERNAME"); Log.Debug(TAG, username); } } } |
Activity navigation
Any app of any complexity that you build will include more than one Activity. As your users move around your app and from one Activity to another, consistent navigation becomes more important to the app's user experience. Few things frustrate users more than basic navigation that behaves in inconsistent and unexpected ways. Thoughtfully designing your app's navigation will make using your app predictable and reliable for your users.
Android system supports two different forms of navigation strategies for your app.
- Back (temporal) navigation, provided by the device Back button, and the back stack.
- Up (ancestral) navigation, provided by you as an option in the app bar.
Back navigation, tasks and the back stack
Back navigation allows your users to return to the previous Activity by tapping the device back button. Back navigation is also called temporal navigation because the back button navigates the history of recently viewed screens, in reverse chronological order.
The back stack is the set of each Activity that the user has visited and that can be returned to by the user with the back button. Each time a new Activity starts, it is pushed onto the back stack and takes user focus. The previous Activity is stopped but is still available in the back stack.
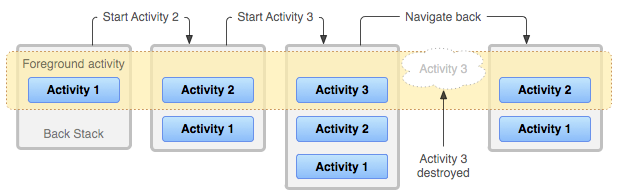
Because an app can start an Activity both inside and outside a single app, the back stack contains each Activity that has been launched by the user in reverse order. Each time the user presses the Back button, each Activity in the stack is popped off to reveal the previous one, until the user returns to the Home screen.
Tasks
Android provides a back stack for each task. A task is an organizing concept for each Activity the user interacts with when performing an operation, whether they are inside your app or across multiple apps. Most tasks start from the Android home screen, and tapping an app icon starts a task (and a new back stack) for that app. If the user uses an app for a while, taps home, and starts a new app, that new app launches in its own task and has its own back stack.
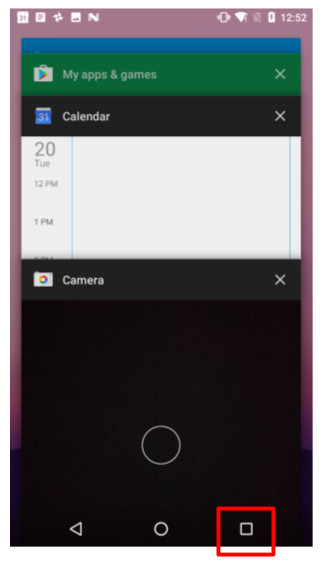
If the user returns to the first app, that first task's back stack returns. Navigating with the Back button returns only to the Activity in the current task, not for all tasks running on the device. Android enables the user to navigate between tasks with the overview or recent tasks screen, accessible with the square button on lower right corner of the device.
Managing tasks
In most cases you don't have to worry about managing either tasks or the back stack for your app—the system keeps track of these things for you, and the back button is always available on the device.
There may, however, be times where you may want to override the default behavior for tasks or for the back stack.
Up navigation
Up navigation, sometimes referred to as ancestral or logical navigation, is used to navigate within an app based on the explicit hierarchical relationships between screens.
With Up navigation, each Activity is arranged in a hierarchy, and each "child" Activity shows a left-facing arrow in the app bar Up button (in app bar) that returns the user to the "parent" Activity. The topmost Activity in the hierarchy is usually MainActivity, and the user cannot go up from there.
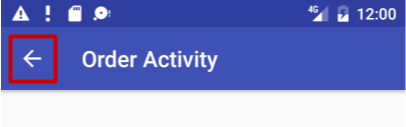
For instance, if the main Activity in an email app is a list of all messages, selecting a message launches a second Activity to display that single email. In this case the message Activity would provide an Up button that returns to the list of messages.
Implementing up navigation
There two ways to implement the up navigation:
- Using [Activity(Parent = "")]
- Using the [MetaData()] attribute
MetaData supports backward compatibility
Using the MetaData supports backward compatibility on older Android devices. Its recommended to use both methods to create a consistent up navigation experience.
Implement back using [Activity] attribute
Decorate the descendant activity with the [Activity] and specify the Parent type as follows:
1 2 3 | [Activity(Label = "ChatActivity", Theme = "@style/AppTheme", ParentActivity = typeof(MainActivity)] public class ChatActivity : AppCompatActivity { ... } |
The ParentActivity = typeof(MainActivity) specifies that MainActivity is the parent of the ChatActivity. In the AndroidManifest.xml file the following will be generated:
1 2 3 4 5 | <activity android:label="ChatActivity" android:parentActivityName="com.peruzal.helloworld.MainActivity" android:theme="@style/AppTheme" android:name="md5982a942979eaad736ab55d3d1d394dbb.ChatActivity" /> |
Implementing up using the [MetaData]
To use the [MetaData] attribute you should give the parent activity a name using Name in the [Activity]. The name should be fully qualified as follows:
1 | [Activity( Name = "com.peruzal.helloworld.MainActivity", ...)]
|
then in the descendant activity, e.g the ChatActivity is the child of the MainActivity as follows:
1 2 3 4 | [Activity(Label = "ChatActivity", Theme = "@style/AppTheme", ParentActivity = typeof(MainActivity))] [MetaData("android.support.PARENT_ACTIVITY", Value = "com.peruzal.helloworld.MainActivity")] public class ChatActivity : AppCompatActivity {...} |
Meta attribute name
The name should be exactly be android.support.PARENT_ACTIVITY and the value be the fully qualified name of the activity. The back button will not show if the name does not match android.support.PARENT_ACTIVITY.
Activity life cycle
The activity lifecycle is the set of states an activity can be in during its entire lifetime, from the time it's created to when it's destroyed and the system reclaims its resources.
Activity life cycle and callback methods
When an Activity transitions into and out of the different lifecycle states as it runs, the Android system calls several lifecycle callback methods at each stage. All of the callback methods are hooks that you can override in each of your Activity classes to define how that Activity behaves when the user leaves and re-enters the Activity.
