Android Views
The UI consists of a hierarchy of objects called views - every element on the screen is a View. The View represents the basic building block for all UI components, and the base class for classes that provide interactive UI components such as button, checkboxes, and text entry fields.
A view consists of :
- two required dimensions expressed as width and height
- the unit for dimensions is in density-independent pixel(dpi)
Common frequently used views are :
TextViewEditTextButtonImageViewScrollView,ListViewandRecyclerViewused for displaying scrollable itemsLinearLayoutused for containing other viewsRelativeLayoutused for containing other views
You can specify View elements in layout resources. Layout resources are written in XML and listed within the Resources -> layout.
ViewGroup containers
Views can be grouped inside a container. The base class for the Android container is the ViewGroup. When you define views, the views will be inside a ViewGroup. In Android, a the ViewGroups can be nested created a parent-child relationship.
- The root of the ViewGroup
- The first set of child
Viewelements andViewGroupgroups whose parent is root.
Some ViewGroup are designed as layouts because they organize child View elements in a specific way. Some examples layout ViewGroups are:
- CoordinatorLayout
- DrawerLayout
- LinearLayout
- Relativelayout
- Framelayout
- RecyclerView
- GridLayout
![Viewgroup example][2]
In the figure above:
LinearLayout, the rootViewGroup, contains all the childViewelements in a vertical orientation.Button(button_toast). The first childViewelement appears at the top in the LinearLayout.TextView(show_count). The second childViewelement appears under the first childViewelement in the LinearLayout.Button(button_count). The third childViewelement appears under the second childViewelement in the LinearLayout.
View Performance
The layout hierarchy can grow to be complex for an app that shows many View elements on a screen. Deep nested ViewGroups can cause performance issues. Its recommended to use layouts that can accomplish flat layouts e.g using the ConstraintLayout instead of the LinearLayout. You should try to avoid nesting more than three levels deep.
View Properties
Views have two required properties, width and height. These two properties are set using the android:layout_width and android:layout_height. Another important property is the id property, this is used to name the views so that they can be referenced in code and in other parts of the layout file.
Automatic view sizing
There are two special values you can use to specify width and height
- Use the
match_parentto take the full width or height as the parent view. - Use the
wrap_contentjust large enough to fit the content.
The following defines the parent layout to match both the width and height of the phone :
1 2 3 4 5 | <RelativeLayout xmlns:android="http://schemas.android.com/apk/res/android" android:layout_width="match_parent" android:layout_height="match_parent"> ... </RelativeLayout> |
Attribute form
Attributes generally take the form:
android:attribute_name="value"
If the value is a resource, the @ specifies what kind of resource, e.g
android:text="@string/greeting"
The greeting is defined in the Resources -> strings.xml as follows :
1 2 3 4 | <resources> ... <string name="greeting">Hello World!</string> </resources> |
android namespace
View attributes must be prefixed with the Android namespace when defined in XML. Some libraries define their own namespace. You should use those for additional attributes.
1 2 3 | <RelativeLayout xmlns:android="http://schemas.android.com/apk/res/android"> </RelativeLayout> |
The app namespaace is also defined for this layout:
1 2 3 | <RelativeLayout xmlns:app="http://schemas.android.com/apk/res-auto"> </RelativeLayout> |
Identifying a View
To uniquely identify a View and reference it from code or other resources, you must give it an id.
Define the id
The android:id is used to define the id in XML. To define a new id use the @+id/name-of-id as follows:
1 2 3 4 5 | <TextView android:id="@+id/title" android:layout_width="wrap_content" android:layout_height="wrap_content" android:text="@string/greeting" /> |
Line 1 defines an id, title, for the TextView.
Referencing the View from code
Once an id is defined, we can now reference the View from code. The id can referenced using the Resource.Id.title as follows:
1 | TextView textView = FindViewById<TextView>(Resource.Id.title); |
We can now access the properties defined in the TextView using the textView variable.
We use the generic FindViewById<T> to find the view by the id.
Ids are integer numbers
The id's are integer numbers that are automatically generated. Its efficient not use numbers that the associated string name.
Id not generated
Sometimes though, if you have an error somewhere in your code the id will not be generated. Try clean and build for Visual studio to re-generate the ids.
Referencing the View from other Views
You can also reference the View using its id from other views by using the @id/<name>. name referencing the name of a predefined id. Notice that we no long have the + sign. Here is an example of the view being referencing in an xml layout file :
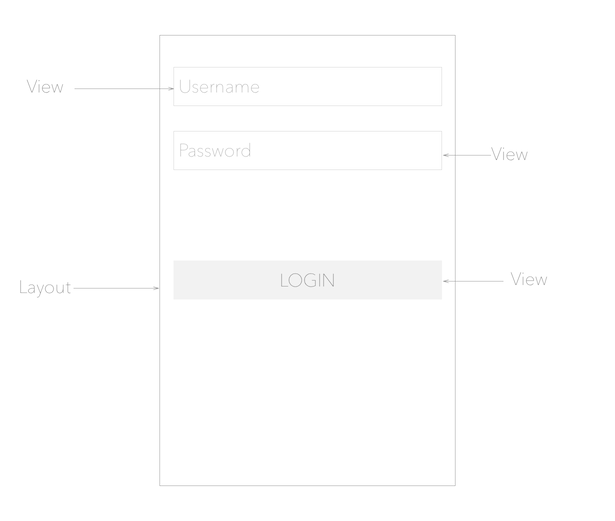
1 2 3 4 5 6 7 8 9 10 11 12 | <EditText android:id="@+id/edit_username" android:hint="Username" android:layout_width="match_parent" android:layout_height="wrap_content" /> <EditText android:layout_below="@id/edit_username" android:id="@+id/edit_password" android:hint="Password" android:inputType="textPassword" android:layout_width="match_parent" android:layout_height="wrap_content" /> |
In line 2, we are defining the id for the username text field, then later on, we want the password field to be below the username text field, so we reference the edit_username id in line 7. The parent ViewGroup is a RelativeLayout. The xml produces the layout as below:
![Defining Id Layout][3]
View Positioning
Besides the width and height and id, the view also need to be positioned. Some layout-related positioning attributes are required for a View or a ViewGroup.
LinearLayout Positioning
LinearLayout is required to have these attributes set:
android:layout_widthandroid:layout_heightandroid:orientation
The android:orientation can be:
horizontal: Views are arranged from left to right. vertical: Views are arranged from top to bottom.
Other layout-related attributes include:
android:layout_gravity: This attribute is used with a UI element to control where the element is arranged within its parent. For example, the following attribute centers the UI element horizontally within the parent ViewGroup:
1 | android:layout_gravity="center_horizontal" |
RelativeLayout Positioning
Another useful Viewgroup for layout is RelativeLayout, which you can use to position child View elements relative to each other or to the parent. The attributes you can use with RelativeLayout include the following:
android:layout_toLeftOf: Positions the right edge of this View to the left of another View (identified by its ID).android:layout_toRightOf: Positions the left edge of this View to the right of another View (identified by its ID).android:layout_centerHorizontal: Centers this View horizontally within its parent.android:layout_centerVertical: Centers this View vertically within its parent.android:layout_alignParentTop: Positions the top edge of this View to match the top edge of the parent.android:layout_alignParentBottom: Positions the bottom edge of this View to match the bottom edge of the parent.
Padding
The other view attribute you will need to adjust is the padding. You can change padding for the left, top, right and bottom of the view. Padding can be change for all sides or individually.
![Padding][4]
In the figure above: (1) Padding is the space between the edges of the TextView (dashed lines) and the content of the TextView (solid line).
Padding vs Margin
Padding is not the same as margin, which is the space from the edge of the View to its parent. Padding affects the space inside the view.
The size of a View includes its padding. The following are commonly used padding attributes:
android:padding: Sets the padding of all four edges.android:paddingTop: Sets the padding of the top edge.android:paddingBottom: Sets the padding of the bottom edge.android:paddingLeft: Sets the padding of the left edge.android:paddingRight: Sets the padding of the right edge.
Style-related attributes
The view can be customized using appearance attributes. Some attributes e.g android:textColor, android:textSize, and android:background are specified in the main theme. Here are some attributes you can change for the view:
android:background: Specifies a color or drawable resource to use as the background.android:text: Specifies text to display in the view.android:textColor: Specifies the text color.android:textSize: Specifies the text size.android:textStyle: Specifies the text style, such as bold.
Android Views
Android views can be created with either code or XML. The most common way is to create Android UIs using XML. Views are created inside layouts. Layouts are the container views.
View dimensions
You can use px(pixel), pt(points 1/72') or in(inch) and mm for sizing but they are not recommended since they do not adapt to different screen displays.
1 | <TextView android:layout_width="500px" .../> |
The above TextView will always occupy 100 physical pixels, so the TextView will look different on different screen sizes.
View dimensions should be defined using dp
Views should be defined in density independent pixels(dp). 1dp = 1px on a screen with 160dpi screen.
1 | <TextView android:layout_width="100dp" .../> |
The above will occupy 100 physical pixels on a 160dpi(dots per inch) screen.
Where does 160dpi come from
The baseline density is derived from the screen of the G1, the first Android device.
The formula to convert dp to pixels is px = dp * \frac{dpi}{160}
The following TextView
1 | <TextView android:layout_width="100dp" .../> |
on a 480dpi screen would be
100dp * \frac{480dpi}{160} = 300px