LinearLayout
In a linear layout, like the name suggests, all the elements are displayed in a single direction either horizontally or vertically and this behavior is specified in android:orientation which is an attribute of the node LinearLayout.
All children of a LinearLayout are displayed sequentially based on the order they are defined within the layout. A LinearLayout respects margins between children and the gravity (right, center, or left alignment) of each child.
Common view attributes you might see used in a LinearLayout:
android:gravity- Controls the alignment of the view content (akin to text-align in CSS)android:layout_gravity- Controls the alignment of the view within it's parent container (akin to float in CSS)android:layout_weight- Specifies how much of the extra space in the layout to be allocated to a view.
Example of LinearLayout snippet:
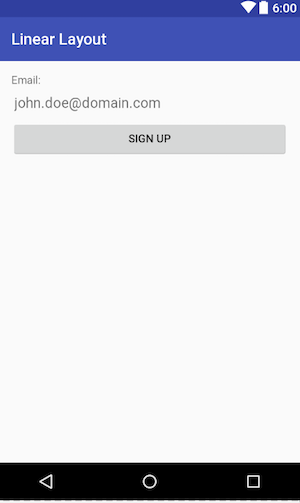
<?xml version="1.0" encoding="utf-8"?>
<!-- Parent linear layout with vertical orientation -->
<LinearLayout
    xmlns:android="http://schemas.android.com/apk/res/android"
    android:padding="16dp"
    android:orientation="vertical"
    android:layout_width="match_parent"
    android:layout_height="match_parent">

    <TextView
        android:layout_width="match_parent"
        android:layout_height="wrap_content"
        android:text="Email:"/>

    <EditText
        android:hint="[email protected]"
        android:layout_width="match_parent"
        android:layout_height="wrap_content"
        android:id="@+id/editText" />

    <Button
        android:text="Sign Up"
        android:layout_width="match_parent"
        android:layout_height="wrap_content" />
</LinearLayout>
Will produce something like the image below. Note that the android:orientation is set to vertical.
Linear Layout Horizontal orientation
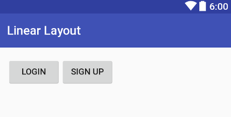
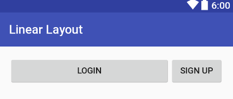
We will group two buttons side by side using a linear layout in horizontal orientation.
<?xml version="1.0" encoding="utf-8"?>
<!-- Parent linear layout with vertical orientation -->
<LinearLayout
    xmlns:android="http://schemas.android.com/apk/res/android"
    android:padding="16dp"
    android:orientation="horizontal"
    android:layout_width="match_parent"
    android:layout_height="match_parent">

    <Button
        android:text="Login"
        android:layout_width="wrap_content"
        android:layout_height="wrap_content" />
    <Button
        android:text="Sign Up"
        android:layout_width="wrap_content"
        android:layout_height="wrap_content" />
</LinearLayout>
And will produce something like the image below :
Distribute Widths with Layout Weight
To distribute the width in a linear layout we use the android:layout_weight property. We can also distribute the height using the same property. Lets make the buttons take equally the same space. Notice that the android:layout_width needs to be match_parent for both buttons and theandroid:layout_weight will be used to proportionally divide the space.
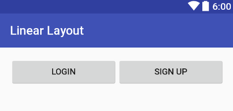
And we can make the Login button take all the remaining space by just giving it the android:layout_weight=1 and wrap_content on the Sign Up button as per the picture below.
If you want to setup a part of your layout, such that, for instance, 3 buttons appear in a row, occupying equal space (or if, for instance, you want to give 4/5 space to a map and 1/5 to another component below it), LinearLayout can be used to do the trick by leveraging android:layout_weight.This works by setting the android:weightSum to a total value and then setting the android:layout_weight value for each subview to determine width distribution.
<?xml version="1.0" encoding="utf-8"?>
<!-- Parent linear layout with vertical orientation -->
<LinearLayout
    xmlns:android="http://schemas.android.com/apk/res/android"
    android:padding="16dp"
    android:orientation="horizontal"
    android:layout_width="match_parent"
    android:layout_height="match_parent">

    <LinearLayout
        android:layout_width="match_parent"
        android:layout_height="wrap_content"
        android:orientation="horizontal"
        android:weightSum="5"
        android:layout_alignParentBottom="true">
        <Button
            android:text="Login"
            android:layout_width="0dp"
            android:layout_weight="2"
            android:layout_height="wrap_content"
            android:layout_alignParentLeft="true" />
        <Button
            android:text="Sign Up"
            android:layout_width="0dp"
            android:layout_weight="3"
            android:layout_height="wrap_content"
            android:layout_alignParentRight="true" />
    </LinearLayout>
</LinearLayout>
{{< note title="Layout Performance" >}}
For performance, when using android:layout_weight, you should set the android:layout_width=0dp so that Android does not have to calculate the width as well since its already being calculated using android:layout_weight.
{{< /note >}}
Using the above XML, Login will have 2/5 of total container width and Sign Up will have 3/5 of parent width because we set the total android:weightSum to 5 and the buttons android:layout_weight property to 2 and 3 respectively.
Use caution in utilizing multiple nested LinearLayouts and/or layout_weight from a performance standpoint!
Gravity
The android:layout_gravity is used to position the view within its parent. We can place the view to the left, right, start, bottom, center and so on.
<?xml version="1.0" encoding="utf-8"?>
<!-- Parent linear layout with vertical orientation -->
<LinearLayout
    xmlns:android="http://schemas.android.com/apk/res/android"
    android:padding="16dp"
    android:orientation="vertical"
    android:layout_width="match_parent"
    android:layout_height="match_parent">

    <EditText
        android:layout_width="match_parent"
        android:layout_height="wrap_content"
        android:hint="TO" />
    <EditText
        android:layout_width="match_parent"
        android:layout_height="wrap_content"
        android:hint="Subject" />
    <EditText
        android:layout_width="match_parent"
        android:layout_height="0dp"
        android:layout_weight="1"
        android:gravity="top"
        android:hint="Message" />
    <Button
        android:layout_width="100dp"
        android:layout_height="wrap_content"
        android:layout_gravity="right"
        android:text="Send" />
</LinearLayout>
In the image below the android:layout_gravity property is used to place the Send button to the right :

Nesting Layouts
We can nest a LinearLayout inside another LinearLayout. For performance you should limit the nesting to only 2 levels. Excessive nesting reduces drawing performance.
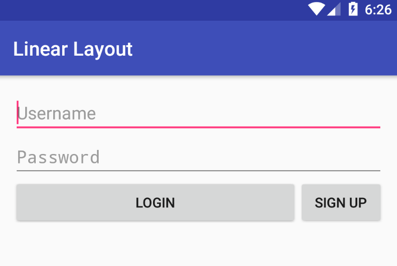
<?xml version="1.0" encoding="utf-8"?>
<!-- Parent linear layout with vertical orientation -->
<LinearLayout
    xmlns:android="http://schemas.android.com/apk/res/android"
    android:padding="16dp"
    android:orientation="vertical"
    android:layout_width="match_parent"
    android:layout_height="match_parent">

    <EditText
        android:hint="Username"
        android:layout_width="match_parent"
        android:layout_height="wrap_content" />
    <EditText
        android:hint="Password"
        android:inputType="textPassword"
        android:layout_width="match_parent"
        android:layout_height="wrap_content" />
    <LinearLayout
        android:orientation="horizontal"
        android:layout_width="match_parent"
        android:layout_height="wrap_content">

        <Button
            android:layout_weight="1"
            android:text="Login"
            android:layout_width="match_parent"
            android:layout_height="wrap_content" />
        <Button
            android:text="Sign Up"
            android:layout_width="wrap_content"
            android:layout_height="wrap_content" />
    </LinearLayout>
</LinearLayout>
Will look like the image below :