Constraint Layout
Introduction
ConstraintLayout is a powerful layout container that can replace both the Linear Layout and the Relative Layout. It enables you to create flat layout hierarchies.
What you should already know
You should be comfortable with the following:
- Creating a simple Android app
- Run an app on the device or emulator
- Understand XML
What you will learn
You will learn the following concepts :
- Creating layouts that uses ConstraintLayout
- Overlay views using
What you will do
- Create a simple Android app
- Create layouts that uses the ConstraintLayout view group
Create an Android Studio Project
- Open Android Studio
- Create a new Project based on the Empty project template
Re-create a Linear Layout in Vertical Orientation with Constraint Layout
We are going to create a layout we created before using a Linear Layout. A linear layout order child views either vertically or horizontally.
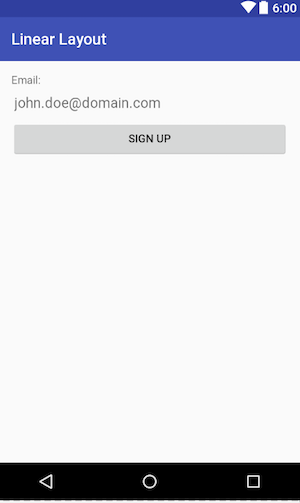
To achieve a similar things, lets start by creating a Constraint layout that mirrors a linear layout in vertical orientation.
- Create a new layout file
- Make the root layout a
ConstraintLayout - Add a TextView
- Add an EditText
- Add a Button
The xml should be as below after adding a constraint layout
<?xml version="1.0" encoding="utf-8"?>
<androidx.constraintlayout.widget.ConstraintLayout
    xmlns:android="http://schemas.android.com/apk/res/android" android:layout_width="match_parent"
    android:layout_height="match_parent">

</androidx.constraintlayout.widget.ConstraintLayout>
and this after adding the views :
<?xml version="1.0" encoding="utf-8"?>
<androidx.constraintlayout.widget.ConstraintLayout
    xmlns:android="http://schemas.android.com/apk/res/android"
    android:padding="16dp"
    android:layout_width="match_parent"
    android:layout_height="match_parent">

    <TextView
        android:text="Email"
        android:layout_width="match_parent"
        android:layout_height="wrap_content" />
    <EditText
        android:hint="Email"
        android:layout_width="match_parent"
        android:layout_height="wrap_content" />
    <Button
        android:text="Sign Up"
        android:layout_width="match_parent"
        android:layout_height="wrap_content" />
</androidx.constraintlayout.widget.ConstraintLayout>
The first view need to be constrained and then the additional views will be constrained to the bottom of the initial view using layout_constraintTop_toBottomOf.
Constraint the initial view
Constraint the TextView to the parent top, start and end :
- Top of the parent -
app:layout_constraintTop_toTopOf="parent" - Start of the parent -
app:layout_constraintStart_toStartOf="parent"- End of the parent -app:layout_constraintEnd_toEndOf="parent"
The xml should be as below:
<TextView
    android:id="@+id/txt_Email"
    app:layout_constraintTop_toTopOf="parent"
    app:layout_constraintStart_toStartOf="parent"
    app:layout_constraintEnd_toEndOf="parent"
    android:text="Email"
    android:layout_width="match_parent"
    android:layout_height="wrap_content" />
Now that the initial view is constrained, we can now constrain the next view below this initial view
Constrain the EditText below the TextView using app:layout_constraintTop_toBottomOf="@id/txt_Email" and also constrain this view to the start and end of the parent with app:layout_constraintStart_toEndOf="parent" and app:layout_constraintEnd_toEndOf="parent".
Also add a top margin android:layout_marginTop="16dp" of 16dp.
The xml should be as follows:
<EditText
    android:layout_marginTop="16dp"
    app:layout_constraintTop_toBottomOf="@id/txt_Email"
    app:layout_constraintStart_toEndOf="parent"
    app:layout_constraintEnd_toEndOf="parent"
    android:hint="Email"
    android:layout_width="match_parent"
    android:layout_height="wrap_content" />
Now we can repeat the same process. First assign an id to the EditText and use it to constrain the button as follows:
<Button
    android:id="@+id/button_sign_up"
    app:layout_constraintTop_toBottomOf="@id/edit_email"
    app:layout_constraintStart_toStartOf="parent"
    app:layout_constraintEnd_toEndOf="parent"
    android:layout_marginTop="16dp"
    android:text="Sign Up"
    android:layout_width="match_parent"
    android:layout_height="wrap_content" />
Here is the complete xml file for the layout :
<?xml version="1.0" encoding="utf-8"?>
<androidx.constraintlayout.widget.ConstraintLayout xmlns:android="http://schemas.android.com/apk/res/android"
    android:padding="16dp"
    android:layout_width="match_parent"
    android:layout_height="match_parent"
    xmlns:app="http://schemas.android.com/apk/res-auto">

    <TextView
        android:id="@+id/txt_email"
        app:layout_constraintTop_toTopOf="parent"
        app:layout_constraintStart_toStartOf="parent"
        app:layout_constraintEnd_toEndOf="parent"
        android:text="Email"
        android:layout_width="match_parent"
        android:layout_height="wrap_content" />
    <EditText
        android:id="@+id/edit_email"
        android:layout_marginTop="16dp"
        app:layout_constraintTop_toBottomOf="@id/txt_email"
        app:layout_constraintStart_toEndOf="parent"
        app:layout_constraintEnd_toEndOf="parent"
        android:hint="Email"
        android:layout_width="match_parent"
        android:layout_height="wrap_content" />
    <Button
        android:id="@+id/button_sign_up"
        app:layout_constraintTop_toBottomOf="@id/edit_email"
        app:layout_constraintStart_toStartOf="parent"
        app:layout_constraintEnd_toEndOf="parent"
        android:layout_marginTop="16dp"
        android:text="Sign Up"
        android:layout_width="match_parent"
        android:layout_height="wrap_content" />
</androidx.constraintlayout.widget.ConstraintLayout>
You have now re-created the linear layout in vertical orientation using a constraint layout.
Re-create a Linear Layout in Vertical Horizontal with Constraint Layout
We are going to use a constraint layout to re-create something you would create with a linear layout in horizontal orientation.
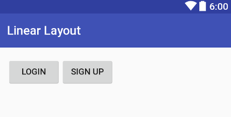
To achieve the layout, the views need to be constraint to each other using ``.
Create a new layout with the root layout container as androidx.constraintlayout.widget.ConstraintLayout.
<?xml version="1.0" encoding="utf-8"?>
<androidx.constraintlayout.widget.ConstraintLayout xmlns:android="http://schemas.android.com/apk/res/android"
    android:orientation="vertical"
    android:layout_width="match_parent"
    android:layout_height="match_parent">

</androidx.constraintlayout.widget.ConstraintLayout>
- Add two button views
- Constraint the first button to the top and left of the parent
- Constrain the second button to the left of the first button
Note, in Android Studio, you can achieve this using chains.
Add buttons to the layout
<?xml version="1.0" encoding="utf-8"?>
<androidx.constraintlayout.widget.ConstraintLayout xmlns:android="http://schemas.android.com/apk/res/android"
    android:orientation="vertical"
    android:layout_width="match_parent"
    android:layout_height="match_parent">

    <Button
        android:id="@+id/button_login"
        android:text="Login"
        android:layout_width="wrap_content"
        android:layout_height="wrap_content" />
    <Button
        android:id="@+id/button_sign_up"
        android:text="Sign Up"
        android:layout_width="wrap_content"
        android:layout_height="wrap_content" />
</androidx.constraintlayout.widget.ConstraintLayout>
Constraint the first button to the parent
Constraint the login button to the parent start and top using app:layout_constraintStart_toStartOf="parent" and app:layout_constraintTop_toTopOf="parent" as follows :
<Button
    app:layout_constraintStart_toStartOf="parent"
    app:layout_constraintTop_toTopOf="parent"
    android:id="@+id/button_login"
    android:text="Login"
    android:layout_width="wrap_content"
    android:layout_height="wrap_content" />
Constraint the sign up button to the login button using the app:layout_constraintStart_toEndOf="@id/button_login" and app:layout_constraintTop_toTopOf="@id/button_login" as follows :
<Button
    android:id="@+id/button_sign_up"
    app:layout_constraintStart_toEndOf="@id/button_login"
    app:layout_constraintTop_toTopOf="@id/button_login"
    android:text="Sign Up"
    android:layout_width="wrap_content"
    android:layout_height="wrap_content" />
Use chains
To use chains, we can constrain the login button end to the start of sign up button and do vice versa but constraining the start of sign up button to the end of login button.
Constraint login button end to start of sign up button using app:layout_constraintEnd_toStartOf="@id/button_sign_up"
<Button
    android:id="@+id/button_login"
    android:layout_width="wrap_content"
    android:layout_height="wrap_content"
    android:text="Login"
    app:layout_constraintEnd_toStartOf="@+id/button_sign_up"
    app:layout_constraintStart_toStartOf="parent"
    app:layout_constraintTop_toTopOf="parent" />
and then constraint sign up button to the end of login button with app:layout_constraintStart_toEndOf="@+id/button_login" as follows :
    <Button
    android:id="@+id/button_sign_up"
    android:layout_width="wrap_content"
    android:layout_height="wrap_content"
    android:layout_marginStart="16dp"
    android:text="Sign Up"
    app:layout_constraintStart_toEndOf="@+id/button_login"
    app:layout_constraintTop_toTopOf="@id/button_login" />
Note that we also made the sign up button top be constrained to the login button's top as well using app:layout_constraintTop_toTopOf="@+id/button_login".
The complete layout file will be as follows :
<?xml version="1.0" encoding="utf-8"?>
<androidx.constraintlayout.widget.ConstraintLayout
    xmlns:android="http://schemas.android.com/apk/res/android"
    xmlns:app="http://schemas.android.com/apk/res-auto"
    xmlns:tools="http://schemas.android.com/tools"
    android:layout_width="match_parent"
    android:layout_height="match_parent"
    android:orientation="vertical">

    <Button
        android:id="@+id/button_login"
        android:layout_width="wrap_content"
        android:layout_height="wrap_content"
        android:text="Login"
        app:layout_constraintEnd_toStartOf="@+id/button_sign_up"
        app:layout_constraintStart_toStartOf="parent"
        app:layout_constraintTop_toTopOf="parent" />

    <Button
        android:id="@+id/button_sign_up"
        android:layout_width="wrap_content"
        android:layout_height="wrap_content"
        android:layout_marginStart="16dp"
        android:text="Sign Up"
        app:layout_constraintStart_toEndOf="@+id/button_login"
        app:layout_constraintTop_toTopOf="@+id/button_login" />
</androidx.constraintlayout.widget.ConstraintLayout>
Constrain layouts with weight
We can also achieve the weights used in a linear layout with a constraint layout. We are going to re-create the horizontal linear layout layout with equal width as the image below :
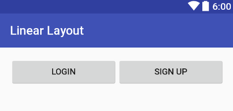
To achieve that we need to make the width match the constraint by setting it to 0dp as follows android:layout_width="0dp".
The resulting xml should be as follows :
<?xml version="1.0" encoding="utf-8"?>
<androidx.constraintlayout.widget.ConstraintLayout
    xmlns:android="http://schemas.android.com/apk/res/android"
    xmlns:app="http://schemas.android.com/apk/res-auto"
    android:padding="16dp"
    android:layout_width="match_parent"
    android:layout_height="match_parent"
    android:orientation="vertical">

    <Button
        android:id="@+id/button_login"
        android:layout_width="0dp"
        android:layout_height="wrap_content"
        android:text="Login"
        app:layout_constraintEnd_toStartOf="@+id/button_sign_up"
        app:layout_constraintStart_toStartOf="parent"
        app:layout_constraintTop_toTopOf="parent" />

    <Button
        android:id="@+id/button_sign_up"
        android:layout_width="0dp"
        android:layout_height="wrap_content"
        android:text="Sign Up"
        app:layout_constraintEnd_toEndOf="parent"
        app:layout_constraintStart_toEndOf="@+id/button_login"
        app:layout_constraintTop_toTopOf="@+id/button_login" />
</androidx.constraintlayout.widget.ConstraintLayout>
Note that we have also constrained the sign up button to the end of the parent with app:layout_constraintEnd_toEndOf="parent".
Horizontal Weight
We are going to use weight to make the login button slightly longer than the sign up button. The properties are :
- app:layout_constraintHorizontal_weight - Horizontal weight
- app:layout_constraintVertical_weight - Vertical weight
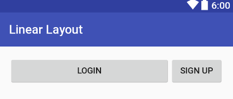
The login button should have width set to 0dp to match the constraint.
<Button
    app:layout_constraintHorizontal_weight="1"
    android:id="@+id/button_login"
    android:layout_width="0dp"
    android:layout_height="wrap_content"
    android:text="Login"
    app:layout_constraintEnd_toStartOf="@+id/button_sign_up"
    app:layout_constraintStart_toStartOf="parent"
    app:layout_constraintTop_toTopOf="parent" />
and make the width of the sign up button to be android:layout_width="wrap_content" as follows :
<Button
    android:id="@+id/button_sign_up"
    android:layout_width="wrap_content"
    android:layout_height="wrap_content"
    android:text="Sign Up"
    app:layout_constraintEnd_toEndOf="parent"
    app:layout_constraintStart_toEndOf="@+id/button_login"
    app:layout_constraintTop_toTopOf="@+id/button_login" />
You should now have achieved the above layout.
Weight in vertical orientation
We can also apply the weight for views that are aligned vertically. Lets re-create the below ui from a previous exercise using linear layout :

Create a layout and start with the following xml :
<?xml version="1.0" encoding="utf-8"?>
<androidx.constraintlayout.widget.ConstraintLayout
    xmlns:android="http://schemas.android.com/apk/res/android"
    android:layout_width="match_parent"
    android:layout_height="match_parent">

    <EditText
        android:id="@+id/edit_to"
        android:hint="To"
        android:layout_width="match_parent"
        android:layout_height="wrap_content" />
    <EditText
        android:id="@+id/edit_seubject"
        android:hint="Subject"
        android:layout_width="match_parent"
        android:layout_height="wrap_content" />
    <EditText
        android:id="@+id/edit_message"
        android:hint="Message"
        android:layout_width="match_parent"
        android:layout_height="wrap_content" />
    <Button
        android:id="@+id/button_message"
        android:text="Send"
        android:layout_width="wrap_content"
        android:layout_height="wrap_content" />
</androidx.constraintlayout.widget.ConstraintLayout>
Create the chains between the views using layout_constraintBottom_toTopOf attribute as follows:
<?xml version="1.0" encoding="utf-8"?>
<androidx.constraintlayout.widget.ConstraintLayout xmlns:android="http://schemas.android.com/apk/res/android"
    xmlns:app="http://schemas.android.com/apk/res-auto"
    android:layout_width="match_parent"
    android:layout_height="match_parent">

    <EditText
        android:id="@+id/edit_to"
        android:layout_width="match_parent"
        android:layout_height="wrap_content"
        android:hint="To"
        app:layout_constraintBottom_toTopOf="@+id/edit_subject"
        app:layout_constraintTop_toTopOf="parent" />

    <EditText
        android:id="@+id/edit_subject"
        android:layout_width="match_parent"
        android:layout_height="wrap_content"
        android:hint="Subject"
        app:layout_constraintBottom_toTopOf="@+id/edit_message"
        app:layout_constraintTop_toBottomOf="@+id/edit_to" />

    <EditText
        android:id="@+id/edit_message"
        android:layout_width="match_parent"
        android:layout_height="wrap_content"
        android:hint="Message"
        app:layout_constraintBottom_toTopOf="@+id/button_message"
        app:layout_constraintTop_toBottomOf="@+id/edit_subject" />

    <Button
        android:id="@+id/button_message"
        android:layout_width="wrap_content"
        android:layout_height="wrap_content"
        android:text="Send"
        app:layout_constraintBottom_toBottomOf="parent"
        app:layout_constraintTop_toBottomOf="@+id/edit_message" />
</androidx.constraintlayout.widget.ConstraintLayout>
We still need to constrain the button to the parent end as follows :
<Button
    android:id="@+id/button_message"
    android:layout_width="wrap_content"
    android:layout_height="wrap_content"
    android:text="Send"
    app:layout_constraintEnd_toEndOf="parent"
    app:layout_constraintBottom_toBottomOf="parent"
    app:layout_constraintTop_toBottomOf="@+id/edit_message" />
To get the message edit text to take the remaining space, change the heigh to 0dp as follows:
<EditText
    android:id="@+id/edit_message"
    android:layout_width="match_parent"
    android:layout_height="0dp"
    android:hint="Message"
    app:layout_constraintBottom_toTopOf="@+id/button_message"
    app:layout_constraintEnd_toEndOf="parent"
    app:layout_constraintStart_toStartOf="parent"
    app:layout_constraintTop_toBottomOf="@+id/edit_subject" />
also constrain the to edit text to match the parent. The complete xml should be as below :
<?xml version="1.0" encoding="utf-8"?>
<androidx.constraintlayout.widget.ConstraintLayout
    xmlns:android="http://schemas.android.com/apk/res/android"
    xmlns:app="http://schemas.android.com/apk/res-auto"
    android:layout_width="match_parent"
    android:layout_height="match_parent">

    <EditText
        android:id="@+id/edit_to"
        android:layout_width="0dp"
        android:layout_height="wrap_content"
        android:hint="To"
        app:layout_constraintBottom_toTopOf="@+id/edit_subject"
        app:layout_constraintEnd_toEndOf="parent"
        app:layout_constraintStart_toStartOf="parent"
        app:layout_constraintTop_toTopOf="parent" />

    <EditText
        android:id="@+id/edit_subject"
        android:layout_width="match_parent"
        android:layout_height="wrap_content"
        android:hint="Subject"
        app:layout_constraintBottom_toTopOf="@+id/edit_message"
        app:layout_constraintEnd_toEndOf="parent"
        app:layout_constraintStart_toStartOf="parent"
        app:layout_constraintTop_toBottomOf="@+id/edit_to" />

    <EditText
        android:id="@+id/edit_message"
        android:layout_width="match_parent"
        android:layout_height="0dp"
        android:hint="Message"
        android:gravity="top|left"
        app:layout_constraintBottom_toTopOf="@+id/button_message"
        app:layout_constraintEnd_toEndOf="parent"
        app:layout_constraintStart_toStartOf="parent"
        app:layout_constraintTop_toBottomOf="@+id/edit_subject" />

    <Button
        android:id="@+id/button_message"
        android:layout_width="wrap_content"
        android:layout_height="wrap_content"
        android:text="Send"
        app:layout_constraintEnd_toEndOf="parent"
        app:layout_constraintBottom_toBottomOf="parent"
        app:layout_constraintTop_toBottomOf="@+id/edit_message" />
</androidx.constraintlayout.widget.ConstraintLayout>
Mimic Relative Layout with Constraint Layout
We can replace a relative with the constraint layout. You have already been doing that from the previous exercises.
The relative layout allows positioning and alignment with the parent and other views. The general constraint attribute will be app:layout_constraintX_toYof attribute. We can constraint the views with the parent or other views.
Create Views Side By Side
We are going to lay two views side by side using a constraint layout. The sign up button start is constrained to the end of the login button using app:layout_constraintStart_toEndOf="@+id/button_login"
Add the following xml :
<?xml version="1.0" encoding="utf-8"?>
<androidx.constraintlayout.widget.ConstraintLayout
    xmlns:android="http://schemas.android.com/apk/res/android"
    xmlns:app="http://schemas.android.com/apk/res-auto"
    xmlns:tools="http://schemas.android.com/tools"
    android:layout_width="match_parent"
    android:layout_height="match_parent">

    <Button
        android:id="@+id/button_login"
        android:layout_width="wrap_content"
        android:layout_height="wrap_content"
        android:text="Login"
        app:layout_constraintEnd_toStartOf="@+id/button_sign_up"
        app:layout_constraintStart_toStartOf="parent"
        app:layout_constraintTop_toTopOf="parent" />

    <Button
        android:id="@+id/button_sign_up"
        android:layout_width="wrap_content"
        android:layout_height="wrap_content"
        android:layout_marginStart="16dp"
        android:text="Sign Up"
        app:layout_constraintStart_toEndOf="@id/button_login"
        app:layout_constraintTop_toTopOf="@id/button_login" />
</androidx.constraintlayout.widget.ConstraintLayout>
Create a Login Screen
Using all the information, lets create the following login screen using a constraint layout.
Add image background

Start by constraining the image view as follows :
| Description | Constraint |
|---|---|
| Start of image view with parent | app:layout_constraintStart_toStartOf="parent" |
| End of image view with parent | app:layout_constraintEnd_toEndOf="parent" |
| Top of image view with parent | app:layout_constraintTop_toTopOf="parent" |
| Bottom of image view with parent | app:layout_constraintBottom_toBottomOf="parent" |
| Make the image fill the entire screen | android:scaleType="centerCrop" |
The image should be as follows now :
<ImageView
    app:layout_constraintStart_toStartOf="parent"
    app:layout_constraintEnd_toEndOf="parent"
    app:layout_constraintTop_toTopOf="parent"
    app:layout_constraintBottom_toBottomOf="parent"
    android:id="@+id/image_background"
    android:scaleType="centerCrop"
    android:src="@drawable/welcome"
    android:layout_width="0dp"
    android:layout_height="0dp" />
Add overlay
Add an overlay on top of the image view. The overlay will be sem-transparent. Use the following properties :
| Description | Constraint |
|---|---|
| Id of the overlay view | android:id="@+id/view_overlay" |
| Position with the start with parent | app:layout_constraintStart_toStartOf="parent" |
| Position end with parent | app:layout_constraintEnd_toEndOf="parent" |
| Position bottom with parent | app:layout_constraintBottom_toBottomOf="parent" |
| Semi-transparent of 80% | android:alpha="0.8" |
| Black background color | android:background="#000" |
The xml should be as below :
xml
<View
app:layout_constraintStart_toStartOf="parent"
app:layout_constraintEnd_toEndOf="parent"
app:layout_constraintTop_toTopOf="parent"
app:layout_constraintBottom_toBottomOf="parent"
android:alpha="0.8"
android:background="#000"
android:id="@+id/view_overlay"
android:layout_width="match_parent"
android:layout_height="match_parent" />
Add guideline
We will use four guidelines to align our views again. A top, bottom, start and end guide.

Add the following xml :
<androidx.constraintlayout.widget.Guideline
    android:id="@+id/guideline_top"
    android:layout_width="wrap_content"
    android:layout_height="wrap_content"
    android:orientation="horizontal"
    app:layout_constraintGuide_begin="16dp" />

<androidx.constraintlayout.widget.Guideline
    android:id="@+id/guideline_bottom"
    android:layout_width="wrap_content"
    android:layout_height="wrap_content"
    android:orientation="horizontal"
    app:layout_constraintGuide_end="16dp" />

<androidx.constraintlayout.widget.Guideline
    android:id="@+id/guideline_start"
    android:layout_width="wrap_content"
    android:layout_height="wrap_content"
    android:orientation="vertical"
    app:layout_constraintGuide_begin="16dp" />

<androidx.constraintlayout.widget.Guideline
    android:id="@+id/guideline_end"
    android:layout_width="wrap_content"
    android:layout_height="wrap_content"
    android:orientation="vertical"
    app:layout_constraintGuide_end="16dp"/>
Add an image view logo
Add an image view and align it with the parent top and the start of the guideline. When done, you should get the folloowing :
Add the following xml for the image view :
<ImageView
    android:id="@+id/image_logo"
    app:layout_constraintTop_toTopOf="@id/guideline_top"
    app:layout_constraintStart_toStartOf="@id/guideline_start"
    android:src="@drawable/logo_peruzal"
    android:scaleType="fitCenter"
    android:layout_width="100dp"
    android:layout_height="100dp" />
Add a title text view

The title should be centered against the image view and also add constraint bias to pull it a bit up as follows :
Add the following xml :
<TextView
    android:id="@+id/text_title"
    style="@style/TextAppearance.AppCompat.Title"
    android:layout_width="0dp"
    android:layout_height="wrap_content"
    android:layout_marginLeft="16dp"
    android:text="Welcome to Peruzal"
    android:textColor="#fff"
    app:layout_constraintBottom_toBottomOf="@id/image_logo"
    app:layout_constraintEnd_toStartOf="@id/guideline_end"
    app:layout_constraintStart_toEndOf="@id/image_logo"
    app:layout_constraintTop_toTopOf="@id/image_logo"
    app:layout_constraintVertical_bias="0.30" />
<TextView
    app:layout_constraintTop_toBottomOf="@id/text_title"
    app:layout_constraintStart_toStartOf="@id/text_title"
    android:text="Login to continue"
    android:textColor="#fff"
    android:id="@+id/text_caption"
    android:layout_width="wrap_content"
    android:layout_height="wrap_content" />
Add input fields

Add the two input fields for the username password. Add the following xml :
    <com.google.android.material.textfield.TextInputLayout
        app:layout_constraintStart_toStartOf="@id/guideline_start"
        app:layout_constraintTop_toBottomOf="@id/image_logo"
        app:layout_constraintEnd_toEndOf="@id/guideline_end"
        android:id="@+id/input_username"
        android:theme="@style/TextLabel"
        android:layout_marginTop="@dimen/vertical_margin"
        android:layout_width="0dp"
        android:layout_height="wrap_content">

        <com.google.android.material.textfield.TextInputEditText
            android:drawableLeft="@drawable/ic_mail_outline_white_24dp"
            android:drawablePadding="4dp"
            android:layout_width="match_parent"
            android:layout_height="wrap_content"
            android:textColor="@color/white"
            android:hint="Username" />
    </com.google.android.material.textfield.TextInputLayout>

    <com.google.android.material.textfield.TextInputLayout
        app:layout_constraintStart_toStartOf="@id/guideline_start"
        app:layout_constraintTop_toBottomOf="@id/input_username"
        app:layout_constraintEnd_toEndOf="@id/guideline_end"
        android:id="@+id/input_password"
        android:theme="@style/TextLabel"
        android:layout_marginTop="@dimen/vertical_margin"
        android:layout_width="0dp"
        android:layout_height="wrap_content">

        <com.google.android.material.textfield.TextInputEditText
            android:drawableLeft="@drawable/ic_lock_outline_black_24dp"
            android:drawablePadding="4dp"
            android:layout_width="match_parent"
            android:layout_height="wrap_content"
            android:textColor="@color/white"
            android:inputType="textPassword"
            android:hint="Password" />
    </com.google.android.material.textfield.TextInputLayout>
Note the text fields include a drawable, the drawables are vector icons. To use vector icons you need to add the following line in the gradle.build file :
android {
    ....
    defaultConfig {
        ....
        vectorDrawables.useSupportLibrary = true
    }
}
Add Login Button

Add the login button. The button have some styles applied to make it transparent.
Add the following xml :
<Button
    app:layout_constraintStart_toEndOf="@id/guideline_start"
    app:layout_constraintEnd_toStartOf="@id/guideline_end"
    app:layout_constraintTop_toBottomOf="@id/input_password"
    android:text="Login"
    android:textColor="@color/white"
    android:textStyle="bold"
    android:layout_marginTop="@dimen/vertical_margin"
    android:background="@drawable/button_transparent_background"
    android:layout_width="0dp"
    android:layout_height="wrap_content" />
and here is the xml for drawable/button_transparent_background background :
<?xml version="1.0" encoding="utf-8"?>
<selector xmlns:android="http://schemas.android.com/apk/res/android">
    <item android:state_pressed="true">
        <shape android:shape="rectangle">
            <corners android:radius="4dp" />
            <solid android:color="@color/colorPrimary" />
        </shape>
    </item>
    <item>
        <shape android:shape="rectangle">
            <corners android:radius="4dp" />
            <solid android:color="@android:color/transparent" />
            <stroke android:color="@color/white" android:width="1dp" />
        </shape>
    </item>
</selector>
Add the centered OR text view

We need to add a text view that holds the OR text and also have two views to the left and right. To achieve that, we will need to center the left view bottom to the top and bottom of the OR text and do the same for the right view as well.
Add the following xml :
<View
    app:layout_constraintBottom_toBottomOf="@id/text_or"
    app:layout_constraintEnd_toStartOf="@id/text_or"
    app:layout_constraintStart_toStartOf="@id/guideline_start"
    app:layout_constraintTop_toTopOf="@id/text_or"
    android:id="@+id/view_left"
    android:alpha="0.8"
    android:layout_width="0dp"
    android:layout_height="1dp"
    android:background="@color/white"
    android:layout_marginRight="8dp" />

<TextView
    android:id="@+id/text_or"
    android:layout_width="wrap_content"
    android:layout_height="wrap_content"
    android:layout_marginTop="32dp"
    android:textColor="@color/white"
    android:alpha="0.8"
    android:text="OR"
    app:layout_constraintEnd_toStartOf="@id/guideline_start"
    app:layout_constraintStart_toEndOf="@id/guideline_end"
    app:layout_constraintTop_toBottomOf="@id/button_login" />
<View
    app:layout_constraintTop_toTopOf="@id/text_or"
    app:layout_constraintBottom_toBottomOf="@id/text_or"
    app:layout_constraintStart_toEndOf="@id/text_or"
    app:layout_constraintEnd_toStartOf="@id/guideline_end"
    android:layout_marginLeft="8dp"
    android:alpha="0.8"
    android:id="@+id/view_right"
    android:background="@color/white"
    android:layout_width="0dp"
    android:layout_height="1dp" />
Add the Facebook and Google Login Buttons

Last add the two buttons for Facebook and Google login.
Add the following xml :
<Button
    app:layout_constraintStart_toEndOf="@id/guideline_start"
    app:layout_constraintEnd_toStartOf="@id/guideline_end"
    app:layout_constraintTop_toBottomOf="@id/text_or"
    android:id="@+id/button_facebook_login"
    android:text="Login with Facebook"
    android:textColor="@color/white"
    android:textStyle="bold"
    android:layout_marginTop="@dimen/vertical_margin"
    android:background="@drawable/button_transparent_background"
    android:layout_width="0dp"
    android:layout_height="wrap_content" />

<Button
    app:layout_constraintStart_toEndOf="@id/guideline_start"
    app:layout_constraintEnd_toStartOf="@id/guideline_end"
    app:layout_constraintTop_toBottomOf="@id/button_facebook_login"
    android:id="@+id/button_google_login"
    android:text="Login with Facebook"
    android:textColor="@color/white"
    android:textStyle="bold"
    android:layout_marginTop="@dimen/vertical_margin"
    android:background="@drawable/button_transparent_background"
    android:layout_width="0dp"
    android:layout_height="wrap_content" />